


How To Reduce Measurement Error In Vickers, Rockwell And Brinell Hardness Testing
How To Reduce Measurement Error In Vickers, Rockwell And Brinell Hardness Testing
Hardness testing errors can come from sample preparation, surface condition, test force, indenter wear, calibration blocks, spacing, optical measurement, machine setup, and operator habits. For Vickers, Rockwell, and Brinell testing, reducing error requires a complete control process from sample preparation to final report.
Sample Preparation
Flat, clean, and stable samples help prevent indentation distortion and unstable readings.
Calibration Control
Proper test blocks, certified indenters, and daily verification help detect machine or setup problems early.
Operator Consistency
Standard procedures, correct spacing, proper focusing, and report records reduce human variation.
Hardness testing looks simple, but accurate results depend on many details. The tester must apply the correct force, the indenter must be in good condition, the sample must be properly supported, and the indentation must be measured correctly. If one step is not controlled, the final hardness value may shift even when the machine appears to operate normally. Vickers, Rockwell, and Brinell testing have different measurement principles, so their error sources are not exactly the same. Vickers testing depends on accurate diagonal measurement. Rockwell testing depends on indentation depth and stable loading. Brinell testing depends on force, ball diameter, and accurate indentation diameter measurement. For industrial quality control laboratories, reducing error is not only about buying a better machine. It requires a complete system that includes sample preparation, calibration blocks, indenter inspection, method selection, operator training, environmental control, and traceable reports. Each hardness testing method has its own risk points. Understanding these differences helps buyers and laboratory operators build a more reliable testing process.1. Why Hardness Testing Errors Happen
2. Common Error Sources In Vickers, Rockwell And Brinell Testing
Testing Method Common Error Source Control Focus Vickers Poor polishing, unclear indentation edge, wrong diagonal reading Surface preparation, optical clarity, automatic image measurement Rockwell Thin sample, unstable support, wrong scale, worn indenter Scale selection, sample thickness, anvil support, daily verification Brinell Wrong force/ball combination, poor diameter reading, rough surface Force control, ball indenter, surface cleaning, digital diameter measurement
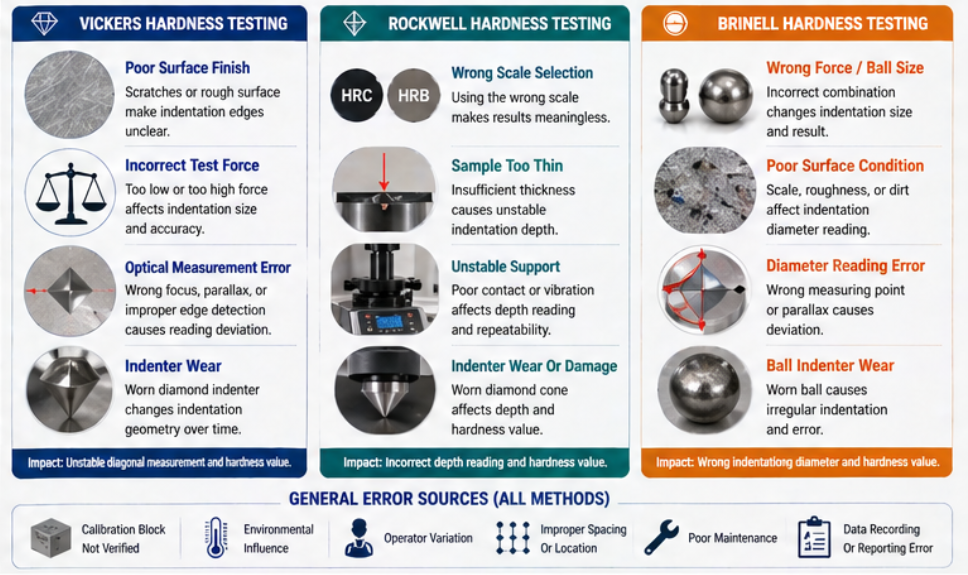
Sample preparation is one of the most common causes of hardness testing error. A rough, dirty, curved, tilted, or poorly supported sample can cause inaccurate readings. For Vickers and Micro Vickers testing, scratches or polishing residue can make indentation edges difficult to measure. For Rockwell testing, a thin or unstable sample can affect indentation depth. For Brinell testing, heavy scale or rough surfaces can affect indentation diameter measurement. The sample surface should be representative of the material being tested. If cutting creates heat damage or deformation, the hardness value near the surface may not reflect the real material condition. When testing coatings, welds, case depth, or small precision parts, metallographic cutting, mounting, grinding, and polishing should be controlled carefully. Clean, dry, and free from oil, dust, scale, and loose particles. Flat enough for stable contact with the indenter. Thick enough for the selected load and method. Properly polished if optical indentation measurement is required. Securely supported by the stage, anvil, or fixture. Not affected by cutting heat, deformation, or surface damage. A common mistake is using a hardness scale or load that does not match the material. For Rockwell testing, using the wrong scale can create readings that are not meaningful. For Vickers testing, a load that is too low may create an indentation too small to measure reliably, while a load that is too high may damage thin layers. For Brinell testing, the force and ball diameter must match the material and expected hardness. Indenter condition is also critical. A worn Rockwell diamond cone, damaged Vickers diamond, or worn Brinell ball can produce wrong results even when the machine is calibrated. Buyers and operators should treat indenters as precision components and check them regularly.3. Control Sample Preparation Before Testing
Before testing, check that the sample is:
4. Use The Correct Test Force, Scale And Indenter
Control Item Why It Matters Recommended Check Test force Controls indentation size and penetration depth Match force with method, material, thickness, and standard Hardness scale Different scales are not interchangeable Confirm HRC, HRB, HV, HBW, or other required scale Indenter condition Worn or damaged indenters distort results Inspect and replace indenters when necessary Dwell time Affects material response under load Use consistent dwell time according to the method requirement
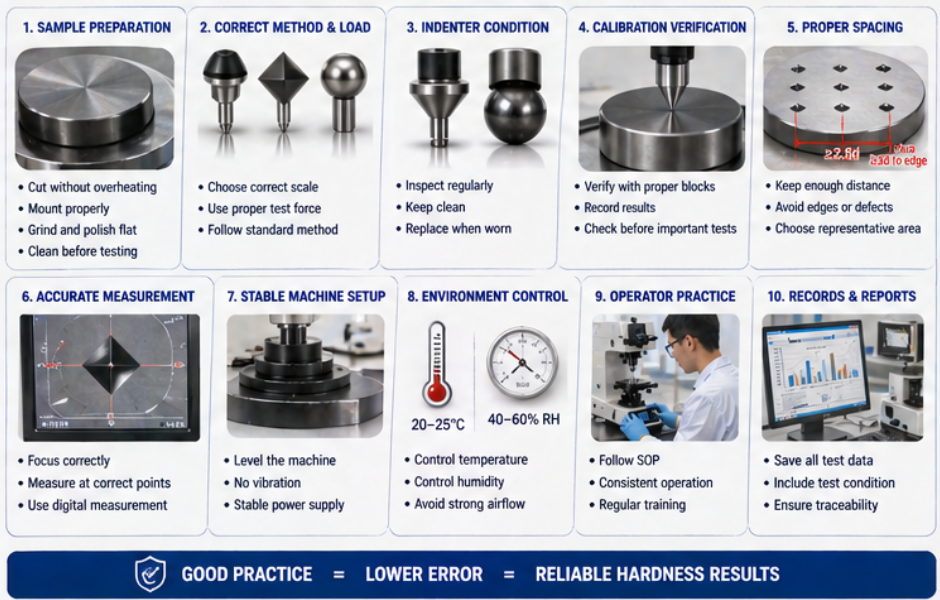
Calibration blocks help confirm whether the hardness tester is producing reliable readings. They should match the method, scale, and hardness range used in daily testing. For example, a Rockwell HRC tester should be checked with suitable HRC blocks near the working range. A Vickers tester should use HV blocks with the required load range. A Brinell tester should use HBW blocks with the correct force and ball diameter condition. Verification should be performed regularly, especially before important batch testing, after machine movement, after indenter replacement, or when abnormal results appear. The verification result should be recorded as part of the laboratory quality system. Calibration blocks should be clean, protected, clearly identified, and not overused in the same area. Damaged or heavily indented blocks should be replaced or recalibrated. Vickers and Brinell testing both require optical measurement. In Vickers testing, the operator measures the diagonal length of the diamond-shaped indentation. In Brinell testing, the operator measures the diameter of the round indentation. Poor focus, low contrast, scratches, uneven lighting, or operator judgment can cause reading differences. Digital image measurement and automatic vision systems can reduce operator variation. They can capture indentation images, detect edges, calculate values, store images, and export reports. For laboratories with high testing volume or customer documentation requirements, automatic measurement can improve both accuracy and efficiency. Polish the surface properly before Vickers testing. Use suitable magnification and clear illumination. Focus on the indentation edge before measurement. Avoid measuring over scratches, pores, scale, or damaged areas. Use digital image measurement for repeated QC work. Save indentation images when traceability is required. Testing too close to an edge, another indentation, a crack, a pore, or a hardened boundary can produce unreliable results. The indentation should be placed in a representative area with enough distance from edges and previous test points. For case depth testing, spacing and location should follow a defined profile from the surface to the core. Test location is especially important for parts with uneven hardness distribution. Castings, forgings, welded parts, carburized layers, nitrided layers, induction-hardened tracks, and coated components may show different hardness in different zones. The operator should test the location required by the standard, drawing, or customer specification. Human operation is a major source of variation in hardness testing. Different operators may prepare samples differently, choose different test locations, focus the microscope differently, or record data differently. A standard operating procedure helps reduce these differences. Operators should be trained in machine setup, sample preparation, method selection, calibration block verification, indenter care, test spacing, optical measurement, data recording, and report export. For laboratories with multiple shifts, routine training and verification are especially important.5. Verify The Machine With Calibration Blocks
6. Reduce Optical Measurement Error In Vickers And Brinell Testing
To improve optical measurement:
7. Follow Proper Indentation Spacing And Test Location Rules
8. Control Operator Training And Testing Procedure
Operator Control Purpose Recommended Practice Standard procedure Reduces variation between operators Create written test steps for each method and material Training Improves correct setup and reading Train operators on sample prep, scales, spacing, and reporting Record keeping Supports traceability and troubleshooting Record sample ID, method, scale, operator, date, and result Result review Detects abnormal data early Compare results with previous batches and verification records
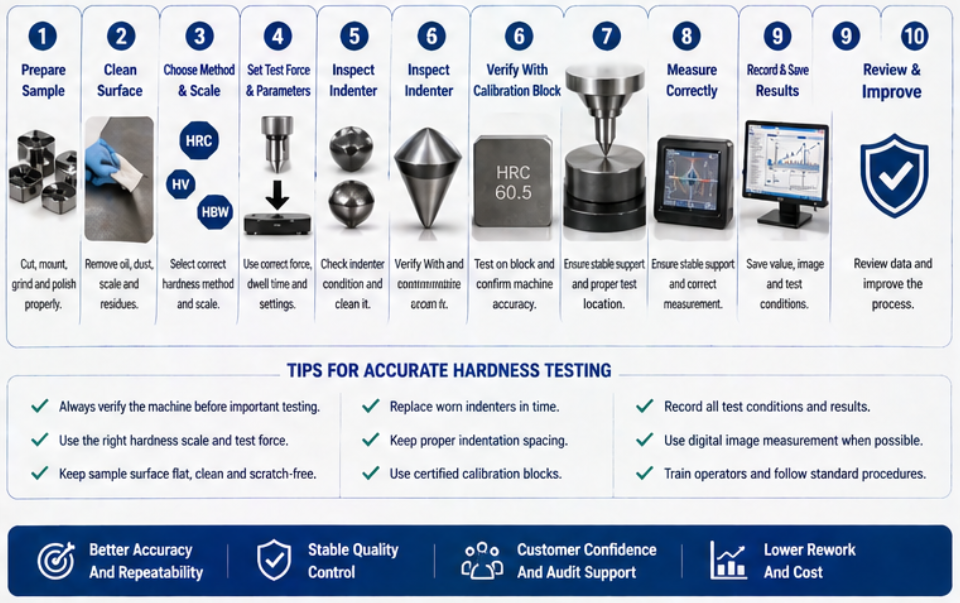
Before improving measurement accuracy or upgrading hardness testing equipment, buyers should review the full testing process. This helps identify whether the main problem is the machine, sample preparation, calibration, operator method, or reporting workflow. Which method is used: Vickers, Rockwell, Brinell, or multiple methods? What material and hardness range are tested most often? Are the correct scale, load, indenter, and test blocks being used? Is the sample flat, clean, thick enough, and properly supported? Is metallographic cutting, mounting, grinding, and polishing needed? Are calibration blocks certified, clean, and close to the working range? Is the indenter worn, damaged, or overdue for inspection? Are operators following the same test procedure? Is optical measurement manual, digital, or automatic? Are results, images, sample IDs, and verification records saved properly? Reducing measurement error in Vickers, Rockwell, and Brinell hardness testing requires more than adjusting one machine setting. Buyers and operators should control sample preparation, scale selection, test force, indenter condition, calibration block verification, optical measurement, indentation spacing, and operator procedure together. For Vickers testing, polished surfaces and accurate indentation measurement are critical. For Rockwell testing, scale selection, sample support, thickness, and indenter condition are key. For Brinell testing, correct force and ball combination, surface condition, and diameter measurement accuracy are essential. A well-controlled hardness testing process improves repeatability, reduces quality disputes, supports customer audits, and makes industrial QC reports more reliable. Common causes include poor sample preparation, wrong scale or load selection, worn indenters, unstable support, unsuitable calibration blocks, and inconsistent operator procedure. Vickers hardness depends on measuring the indentation diagonal. Scratches, residue, poor polishing, or unclear edges can directly affect measurement accuracy. Use the correct Rockwell scale, ensure sample thickness and support, verify with proper test blocks, inspect the indenter, and keep loading conditions consistent. Use the correct ball and test force, prepare a clean surface, measure indentation diameter carefully, and consider digital image measurement for better repeatability.9. Key Questions Before Improving Your Hardness Testing Process
Conclusion: Error Reduction Requires A Complete Testing System
FAQ
What is the most common cause of hardness testing error?
Why does Vickers testing need better surface preparation?
How can Rockwell testing errors be reduced?
How can Brinell indentation reading error be reduced?
Need Help Improving Hardness Testing Accuracy?
Share your hardness testing method, material type, sample condition, current error problem, calibration block details, and daily testing volume. We can help recommend suitable hardness testers, calibration blocks, indenters, sample preparation equipment, and automatic measurement solutions.