


How To Prepare Metallographic Samples Before Hardness Testing
How To Prepare Metallographic Samples Before Hardness Testing
Metallographic sample preparation has a direct impact on hardness testing accuracy. A clean, flat, properly polished sample helps create clear indentations, stable readings, and repeatable results. Before Vickers, Micro Vickers, Rockwell, or Brinell testing, buyers and laboratories should control cutting, mounting, grinding, polishing, cleaning, and sample support.
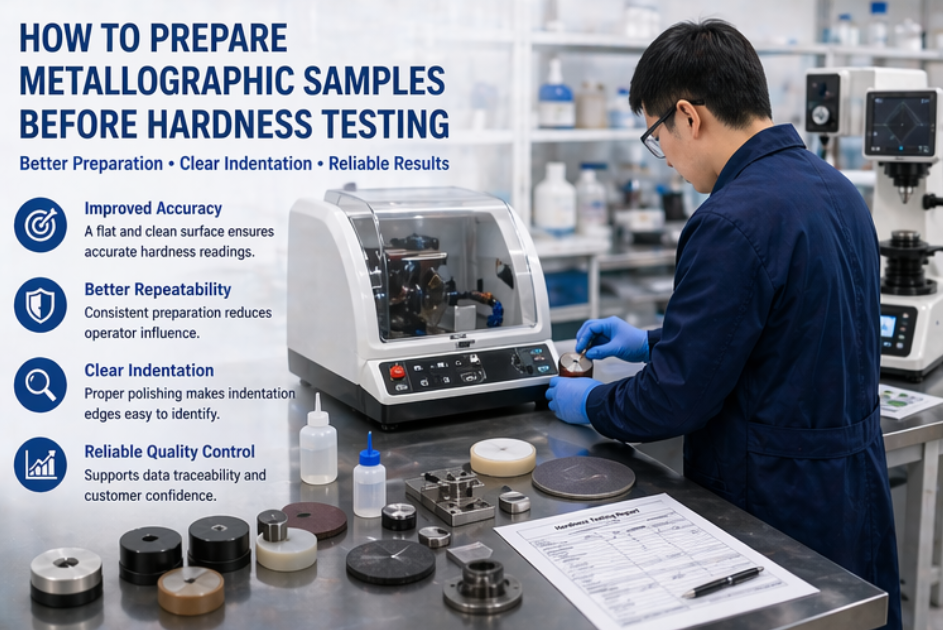
Flat Test Surface
A flat and stable surface helps the indenter contact the sample correctly and reduces measurement error.
Clear Indentation
Good grinding and polishing make Vickers and Micro Vickers indentation edges easier to identify.
Repeatable QC Results
Consistent sample preparation improves hardness comparison across batches, operators, and test locations.
Hardness testing is often seen as a direct measurement process, but the result depends heavily on sample preparation. Even a high-quality hardness tester can produce unstable or misleading readings if the sample surface is rough, curved, contaminated, overheated, poorly supported, or not flat. This is especially true for Vickers and Micro Vickers hardness testing, where the hardness value is calculated from the measured diagonal of a small indentation. Metallographic sample preparation is used to create a representative, clean, flat, and polished testing surface. For thin layers, coatings, weld sections, case depth analysis, and small precision parts, proper preparation is essential. Poor preparation can make indentation edges unclear, cause uneven loading, damage the surface layer, or create readings that do not represent the real material condition. For industrial quality control, sample preparation should be treated as part of the complete hardness testing workflow. The cutting machine, mounting press, grinding and polishing machine, consumables, cleaning method, and sample fixture all affect final test reliability. Cutting is the first step in metallographic sample preparation. The goal is to obtain a sample section without changing the material structure or surface hardness. If cutting creates excessive heat, deformation, cracks, or burning, the hardness value near the test area may be affected. For metals, coatings, welds, and heat-treated parts, buyers should use a proper metallographic cutting machine with suitable cutting discs and coolant. The cutting process should be controlled to minimize thermal damage and mechanical deformation. For very small parts or delicate materials, special clamping and low-damage cutting methods may be needed.1. Why Sample Preparation Matters Before Hardness Testing
2. Start With Correct Sample Cutting
Preparation Step Main Risk Recommended Control Cutting Heat damage, deformation, cracking Use proper cutting disc, coolant, and stable clamping Mounting Poor edge support or tilted sample Choose suitable hot or cold mounting method Grinding Deep scratches and uneven surface Use progressive grit sequence and enough water cooling Polishing Rounded edges or residual scratches Use proper polishing cloth, suspension, pressure, and time
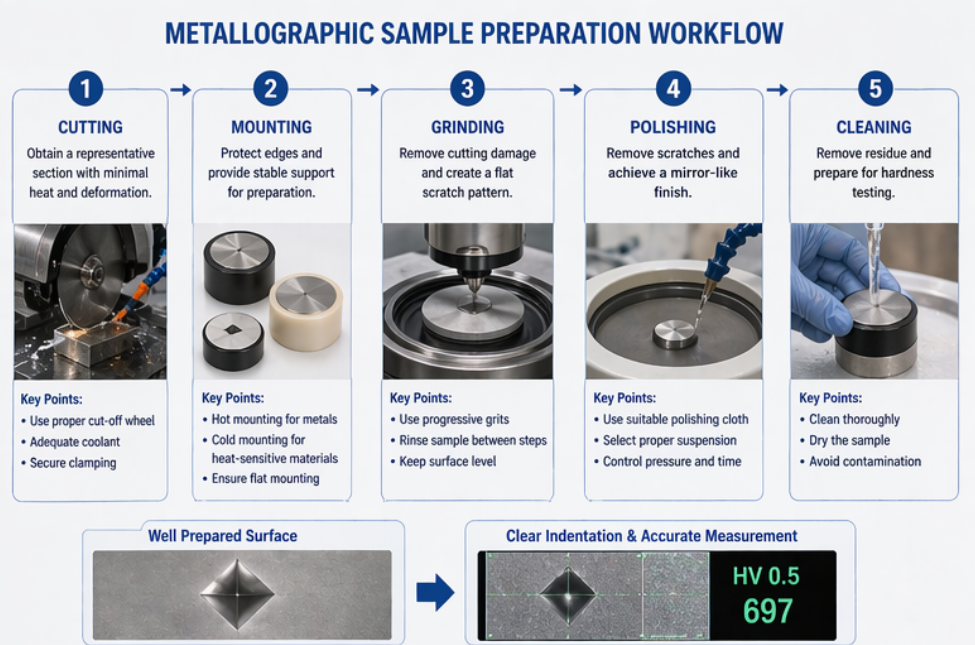
Mounting helps hold small, thin, irregular, or delicate samples securely during grinding, polishing, and hardness testing. A well-mounted sample is easier to handle and provides better support during indentation. This is particularly important for coatings, case depth testing, welded sections, and small precision components. Hot mounting is commonly used for many metal samples because it provides good edge retention, stable support, and efficient preparation. Cold mounting may be better for heat-sensitive materials, fragile coatings, electronic parts, or samples that cannot tolerate mounting temperature and pressure. Buyers should select the mounting method according to material sensitivity, edge retention requirement, and testing purpose. For hardness testing, the sample should be mounted flat and firmly. If the sample is tilted or poorly supported, the indentation may not form correctly. For Micro Vickers and case depth testing, edge retention is especially important because test points may be close to the surface layer or cross-section edge. Grinding removes cutting damage and creates a flat surface. Polishing removes fine scratches and makes the surface suitable for optical measurement. The quality of these two steps directly affects indentation visibility and hardness result repeatability. A typical preparation process uses progressively finer grinding papers followed by polishing with diamond suspension or other suitable polishing media. The exact process depends on material hardness, sample size, and required surface quality. Too much pressure can deform soft materials or round sample edges. Too little grinding may leave deep scratches that affect indentation measurement. For Vickers and Micro Vickers testing, polishing quality is very important because indentation diagonals must be measured clearly. For Rockwell testing, the surface does not always need mirror polishing, but it still needs to be flat, clean, and stable. For Brinell testing, rougher surfaces may be acceptable in some industrial cases, but heavy scale, dirt, or uneven contact should be avoided. After grinding and polishing, cleaning is necessary to remove abrasive particles, polishing suspension, oil, dust, and loose debris. Contamination on the surface can interfere with indentation formation and optical measurement. In Micro Vickers testing, even small particles or residue can make the indentation edge difficult to identify. Samples can be cleaned using suitable solvents, water rinsing, ultrasonic cleaning, or compressed air drying depending on the material and laboratory procedure. The sample should be dry before hardness testing. If etching is needed for microstructure observation, it should be controlled carefully because excessive etching may affect indentation edge clarity. For hardness testing, the goal is not always to reveal the most beautiful microstructure. The goal is to create a reliable test surface where the indenter can contact properly and the indentation can be measured accurately.3. Choose The Right Mounting Method
4. Control Grinding And Polishing Quality
Hardness Method Surface Requirement Preparation Focus Micro Vickers Very clean, flat, polished surface Avoid scratches, edge rounding, and surface deformation Vickers Clear surface for diagonal measurement Ensure indentation edges are visible and measurable Rockwell Flat and stable test surface Avoid scale, curvature, and poor support Brinell Clean representative surface Remove heavy scale and ensure stable contact area 5. Clean The Sample Before Testing
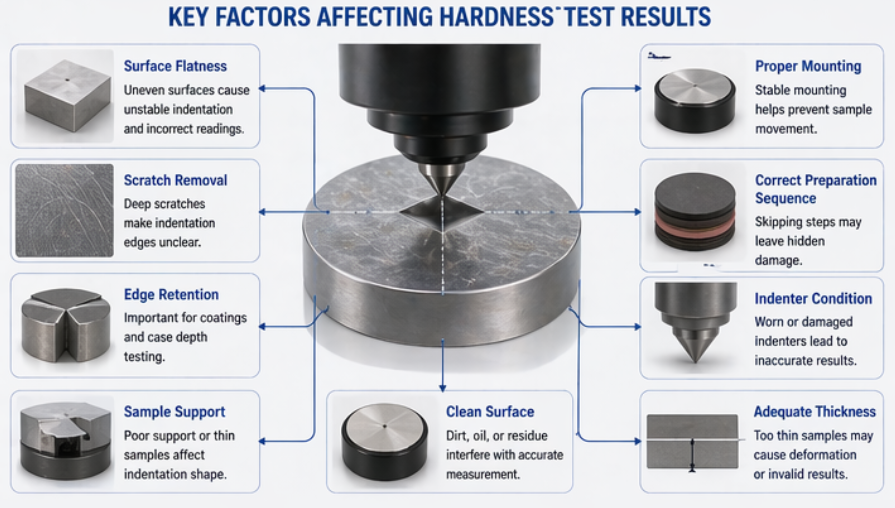
Many hardness testing errors are not caused by the hardness tester itself. They come from poor sample preparation. For example, overheating during cutting can change the surface hardness. Deep grinding scratches can make indentation edges unclear. Poor mounting can cause sample movement. Excessive polishing pressure can round edges or deform soft materials. Another common mistake is testing too close to the sample edge, a previous indentation, or a damaged area. The indentation should be placed in a representative zone with enough distance from edges and other indentations. For case depth testing, test points should follow the required spacing and depth profile. Cutting with too much heat or poor cooling. Testing on a rough, dirty, oxidized, or curved surface. Leaving deep scratches after grinding. Over-polishing soft materials and rounding edges. Mounting the sample at an angle. Testing too close to the sample edge or another indentation. Ignoring sample thickness and support during loading. Using one preparation process for all materials without adjustment. A complete laboratory should not only consider the hardness tester. It should also include suitable metallographic preparation equipment. For many industrial applications, the cutting machine, mounting press, grinding and polishing machine, polishing consumables, sample holders, and cleaning tools are just as important as the tester itself. If the laboratory mainly performs Micro Vickers or Vickers testing, high-quality grinding and polishing are essential. If the laboratory tests coatings or case depth profiles, edge retention and accurate cross-section preparation are critical. If the laboratory focuses on large castings or forgings, sample cutting, surface preparation, and stable support should be considered.6. Avoid Common Preparation Mistakes
Common mistakes to avoid:
7. Match Preparation Equipment With The Hardness Testing Method
Equipment / Consumable Purpose Buyer Checkpoint Metallographic cutting machine Obtain sample section with minimal damage Check cutting capacity, cooling, and clamping Mounting press Support small or irregular samples Choose hot or cold mounting based on material Grinding and polishing machine Create flat and scratch-free surface Check disc size, speed control, and sample holder Polishing consumables Improve final surface quality Choose suitable cloth, suspension, and grit sequence
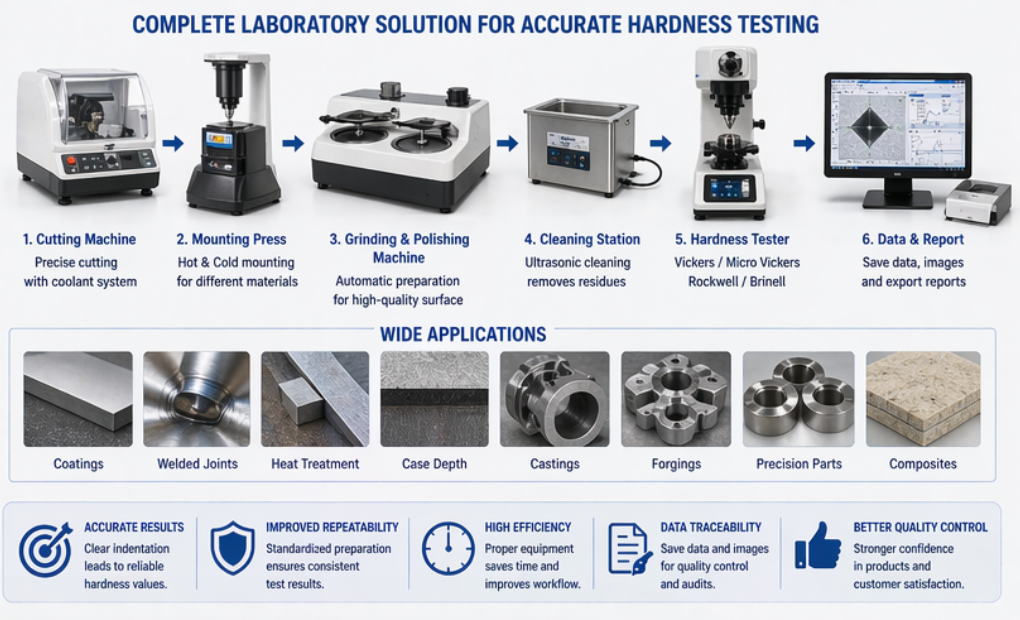
Before choosing metallographic sample preparation equipment or defining a hardness testing process, buyers should prepare clear sample and testing information. This helps match the correct preparation method with the hardness testing requirement. What material will be tested? Is the sample metal, coating, weld section, casting, forging, plastic, or composite? Which hardness method will be used: Vickers, Micro Vickers, Rockwell, or Brinell? Does the sample need cross-section preparation? Is edge retention important for coating or case depth testing? Is the material heat-sensitive or deformation-sensitive? What sample size and thickness need to be prepared? How many samples need to be prepared per day? Do you need manual or automatic grinding and polishing? Do you need a complete preparation and hardness testing solution? Metallographic sample preparation is an important part of hardness testing accuracy. A properly cut, mounted, ground, polished, cleaned, and supported sample helps produce clear indentations and repeatable hardness values. This is especially important for Vickers, Micro Vickers, coatings, case depth analysis, weld sections, and small precision components. Buyers should not treat sample preparation as a secondary process. The hardness tester and preparation equipment should be selected together according to material type, sample geometry, testing method, daily workload, and documentation requirements. A complete preparation workflow can reduce testing errors, improve laboratory efficiency, and make quality control results more trustworthy for production teams, customers, and inspection records. A clean, flat, and polished sample helps the indenter contact the surface correctly and makes the indentation easier to measure, improving result reliability. No. Micro Vickers and Vickers testing usually require better polishing, while Rockwell and Brinell testing may tolerate less polished surfaces depending on the application. Yes. Excessive heat or deformation during cutting can change the surface condition and lead to inaccurate hardness readings. A typical workflow may include a cutting machine, mounting press, grinding and polishing machine, polishing consumables, sample holders, and cleaning tools.8. Key Questions Before Setting Up A Sample Preparation Workflow
Conclusion: Better Preparation Creates More Reliable Hardness Results
FAQ
Why is sample preparation important before hardness testing?
Do all hardness tests require mirror polishing?
Can poor cutting affect hardness results?
What equipment is needed for metallographic preparation?
Need A Complete Sample Preparation And Hardness Testing Solution?
Share your material type, sample size, hardness testing method, preparation requirement, and daily sample quantity. We can help recommend suitable metallographic preparation equipment and hardness testing solutions for your quality control laboratory.